Table of Contents
(Click to jump to that section)
1. Sign In
2. Icons
3. Menu Overview
4. Edit Profile & Upload Data
5. Status Updates
6. My Trips
a. History, Current & Scheduled Loads
g. Load History & Scheduled Loads
7. Logbook
8. Load Walkthrough
9. Support
10. Download As PDF
SIGN IN
Sign In – Login with Microsoft
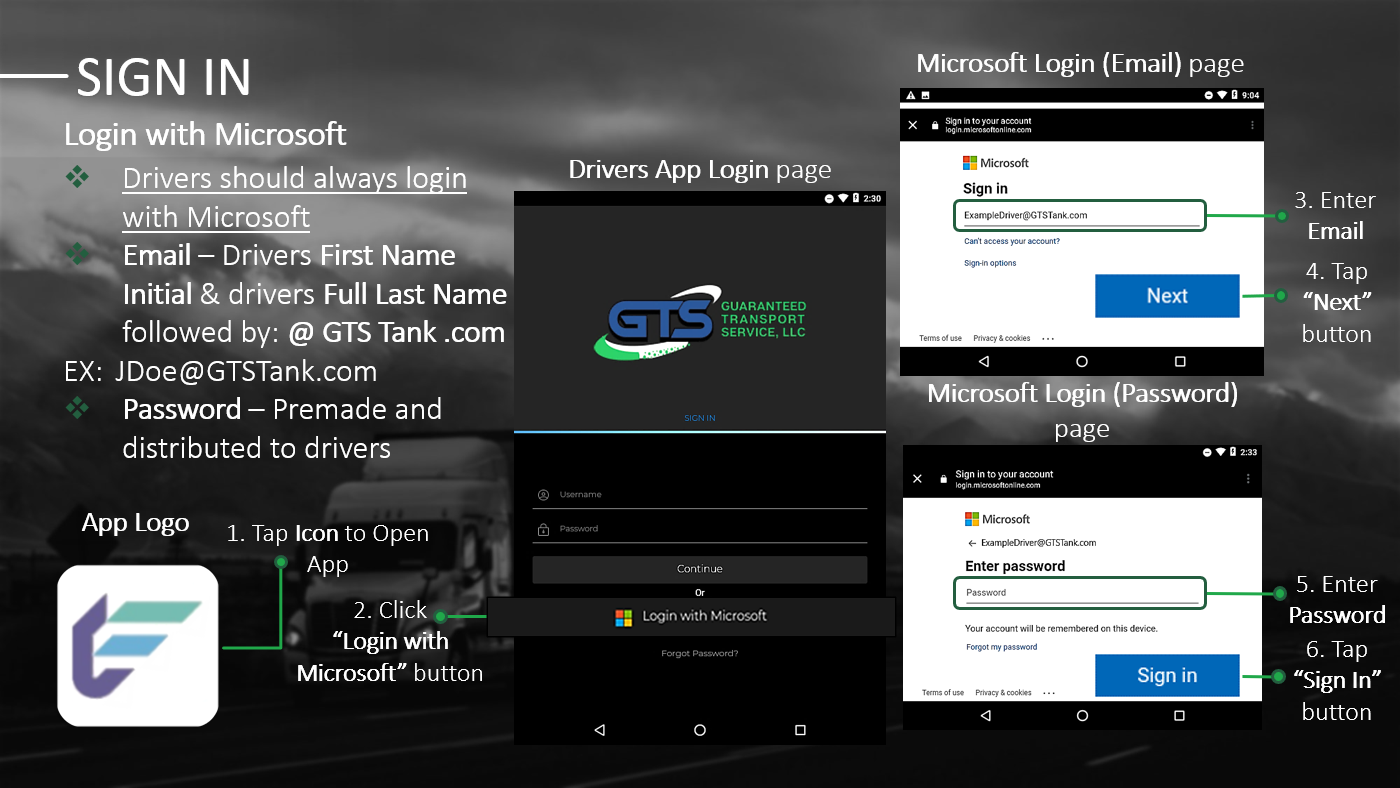
The login page is the first thing you will see when you open the app. All drivers will login through their Microsoft Account. Instead of entering credentials on the app’s main login page, you will be using the Microsoft Login page.
Steps to Login with Microsoft:
- You can open the app on your tablet, by clicking the GTS Drivers App application icon on the tablets home screen. (See image Step 1)
- Once the app loads, it will open to the Login page. You will then select “Login with Microsoft” and the Microsoft Login page will open. (See image Step 2)
- On the Microsoft Login page, you will click the “Email/ Phone/ Skype” field and enter your Email. (See image Step 3)
- Then you can tap on the blue “Next” button, on the bottom right of the screen. (See image Step 4)
- Still on the Microsoft Login page, you can click the “Password” field and enter your Password. (See image Step 5)
- Finally, drivers can click the blue “Sign In” button on the bottom right of the page. (See image Step 6)
- Now you are logged in and the Drivers App will open to the homepage, which is the My Trips section Current tab.
- A driver’s email is also their username. The email for GTS drivers should be as follows: Driver’s First Name Initial, followed by their Full Last Name and “@GTSTank.com” (Ex: Driver John Doe email would be JDoe@GTSTank.com)
Passwords
- Drivers will not be creating their own passwords for the app. Passwords are premade and will be provided to you!
- If you forget your password, Do Not use the “Forgot Password?” link on the app’s login page! Instead, drivers should Call their Dispatcher and notify them that you have forgotten your password!
ICONS
Icons – Functions
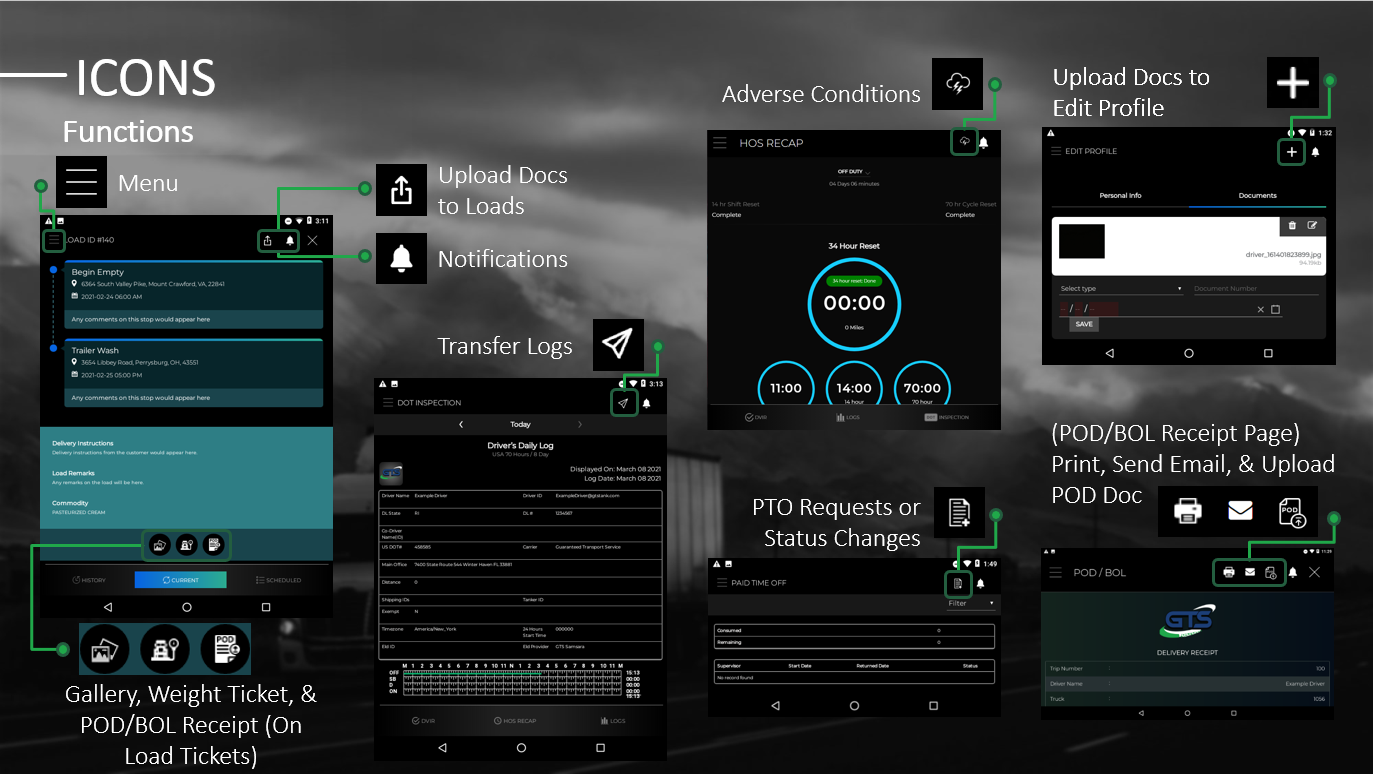
These icons seen throughout the app, are used for many things such as uploading documents, opening menus, sending requests, and more.
Menu Icon
- The Menu icon opens the main Menu. To bring up the Menu, tap on the “Menu” icon. Once opened, you can use the Menu to navigate through the major parts of the app.
- This icon is available throughout the entire app and located at the top left corner of the screen.
- The Menu icon resembles three horizontal lines stacked on top of each other. (See image “Menu”)
Upload Documents (To Current and Previous Loads)
- This Uploading Documents icon is used for uploading docs or images, to current and previous loads. This icon is found only on the Current and History tabs, under the My Trips section.
- To get to the Upload Documents icon, open the Menu, and then select “My Trips” to open the section. After the My Trips section is loaded, you will automatically be on the Current tab and your current load will be opened (if you are not currently assigned a load the Current tab will be blank). To switch to the History tab, click the “History” tab on the bottom of the screen. Finally open a load, from the list on the History tab. The Upload Documents icon should be on the top right of the screen, after a load is opened.
- Unlike the previous loads from the History tab; when you are uploading to a Current Load, you must choose a Document Type. (Document upload types: POD, Weight Ticket, Seal Number, Scale Ticket, Logs Sheets, certificate of cleaning and other.)
- The Upload Documents icon is an arrow pointing upward with a box around it. (See image “Upload Docs to Loads”)
Notifications Icon
- The Notification icon is used to alert drivers of any imperative information. Clicking this icon brings you to the Notifications page where alerts are listed.
- The icon is located at the top right of the screen and it is available on all pages throughout the app.
- The Notifications icon appears as a white bell. (See image “Notifications”)
Gallery, Capture Weight Ticket, & POD/BOL Receipt Icons
- The Gallery icon at the bottom of a load, lets drivers view and edit any documents that have been uploaded to that load.
- The Gallery icon is a black circle with 2 photos inside. (See the first icon in image “Gallery, Weight Ticket & POD/ BOL Receipts”)
- The Capture Weight Ticket icon allows you to upload and view the loads Weight Ticket documents.
- The Weight Ticket icon appears as a truck next to a weigh station, inside of a black circle. (See the second icon in image “Gallery, Weight Ticket & POD/ BOL Receipts”)
- POD/ BOL Receipts icon opens the POD/ BOL page where the driver can upload, email and print delivery receipts.
- The POD/ BOL Receipts icon resembles a document that says POD on top, that is inside of a black circle. (See the third icon in image “Gallery, Weight Ticket & POD/ BOL Receipts”)
- To navigate to the Current and Previous load tickets, from the Menu select “My Trips” to open the My Trips section. When you open the My Trips page, you will automatically be on the Current loads tab and your Current load will be opened. For the Previous load tickets, click on the “History” tab at the bottom left of the page. Then click on a previous load to open it. For both the Current and History tabs, once a load is opened the icons will be at the bottom of the page.
Transfer Logs Icon
- The Transfer Logs icon enables you to transmit your Daily HOS Logs or Dot Inspection Logs using email or web-services. This icon can only be found only on the Dot Inspection or Daily Logs tabs, under the Logbooks section.
- To navigate to the Daily or Dot pages, first open the main “Menu”. Then select “Logbook” to open the Logbooks submenu. Next choose a Logbook page to navigate to (“HOS”, “DVIR”, “Driving Team”, or “Unidentified Driving”). Once one of the previous Logbook pages have been opened, then the Daily Logs and Dot Inspection tabs will be available at the bottom of the screen. Finally tap on the “Daily Logs” or “Dot Inspection” tab, then the Transfer Logs icon will be at the top right of the page.
- The Transfer Logs icon looks like the white outline of a paper plane. (See image “Transfer Logs”)
Adverse Conditions Icon
- The Adverse Conditions icon allows you to enable (or disable) the Adverse Driving Condition on the HOS Recap page. It should be enabled when poor driving conditions (such as bad weather, traffic, or road conditions) increase the time it will take to reach the destination. Thus, an exception is made, that increases the driving time for the day.
- To toggle the Adverse Driving, go to the Menu and click “Logbook” then select the “HOS Recap” tab and the icon will be on the top right corner of the screen.
- The Adverse Conditions icon is a white outline of a lightening cloud. (See image “Adverse Conditions”)
PTO Requests or Status Changes Icon
- The PTO Request or Change Status icon is used for two things: Requesting PTO on the PTO page or changing your Status to On Duty on the Logbook, DVIR page.
- To get to the PTO Requests icon on the PTO page, open the Menu. Under the main Menu click “Paid Time Off” to bring you to PTO page. The PTO Request icon will be at the top right of the page.
- To navigate to the Status Change icon on the DVIR page, open the main “Menu”, go to Logbook then click on “DVIR “to go to the page.
- The PTO Requests or Status Changes icon looks like the outline of a document with a plus sign on the bottom right. (See image “PTO Requests or Status Changes”)
Upload Docs (To Edit Driver’s Profile)
- The Upload Docs icon is for uploading documents types (such as driver’s license, TWIC, passport, ECT and other) related to the Driver’s Profile. This icon is under the Documents tab on the Edit Profile section.
- Open the Menu and tap on the Driver’s Name or Profile Image on the top left of the Menu. This will load the Personal Info tab under the Edit Profile section of the app. On the Personal Info tab, click the “Documents” tab towards the top right of the page to switch to the Documents tab. On the top right of the Documents tab is the Upload Docs icon.
- The Upload Documents icon is a big white plus sign. (See image “Upload Docs to Edit Profile”)
Print, Email, or Upload POD Doc
- These icons are the POD/ BOL pages tool bar. They give drivers the ability to Print, Email, and Upload their loads POD documents. These icons are on the POD/ BOL page under Current loads.
- Open the Current load, under the My trips page from the menu. Then tap the BOL Receipt icon to open the POD/BOL page, and these icons are at the top right of the document.
- The Print Doc icon resembles the outline of a printer in white. (See the first icon in image “Print, Send Email, & Upload POD Doc”)
- The Email Doc icon is a white envelope. (See the second icon in image “Print, Send Email, & Upload POD Doc”)
- The Upload POD Doc icon appears to be an outline of a document labeled POD with a small arrow in the bottom right corner. (See the third icon in image “Print, Send Email, & Upload POD Doc”)
Menu – Menu Overview
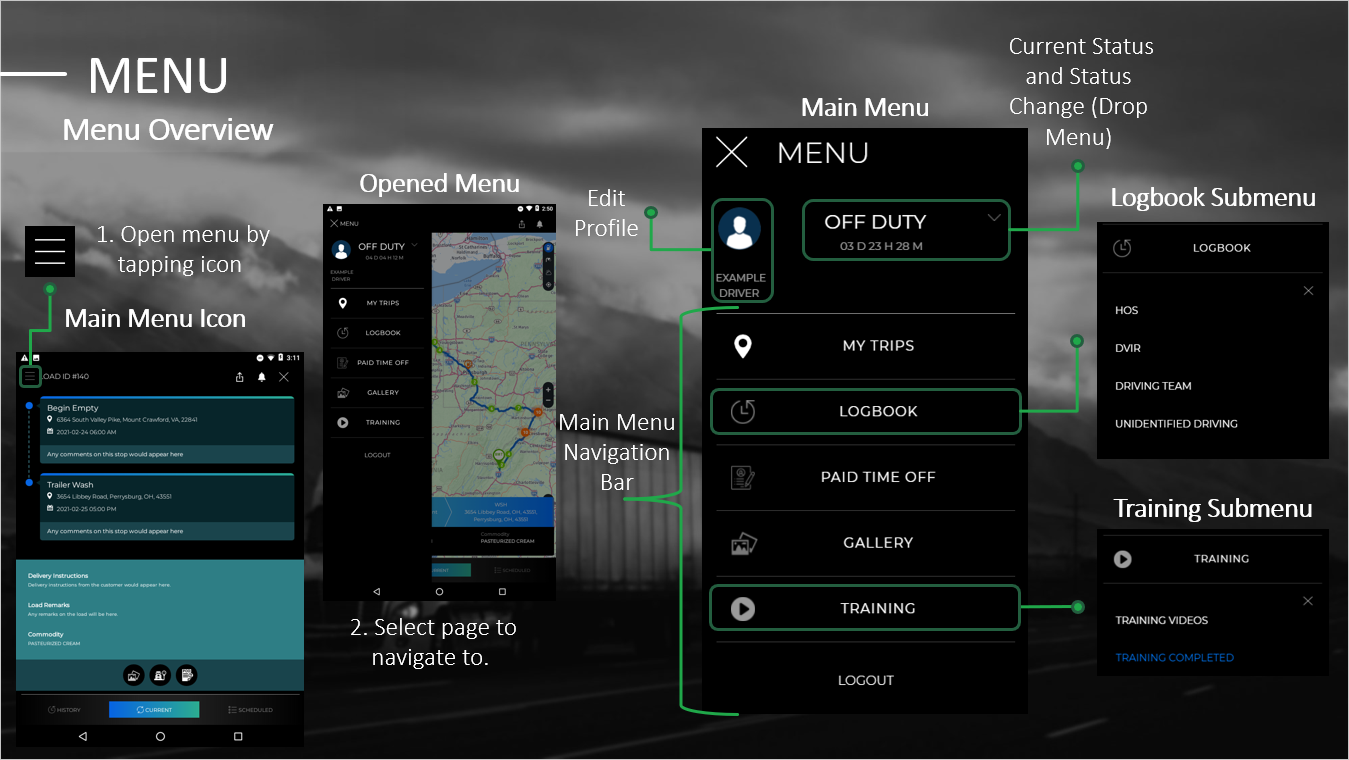
The Menu provides a way to navigate through the app’s different sections. Use it to access the primary content of the app along with the Edit Profile and Status Update pages.
How to open the Menu:
- To open the Menu (after logging into the app), tap the Menu icon with the three horizontal stacked lines, in the top left corner of the screen. (See image Step 1)
- Then the Menu will open from the left side of the screen. Next you can select a page to navigate to from the Menu. (See image Step 2)
There are also two drop-down submenus, Logbook and Training. If you tap “Logbook” or “Training”, their submenus will expand in the main Menu. (See images “Logbook Submenu” or “Training Submenu”)
Menu Pages:
Below is a description of all the Pages you can navigate to directly from the Menu.
-
Edit Profile
Used to edit a driver’s Personal Info and to upload any Documents related to your account (Uploaded Document Types: license, TWIC, passport, ECT, qualification, and other). On the menu, tap on the Driver’s Profile Picture or Driver’s Name (located towards the top left of the menu), this will open the Edit Profile page. (See image “Edit Profile”)
-
Status Update
From when your shift starts till you have clocked out, you are required to update your Status. This page allows you to do so. To open the Status Update page, (from the menu) click your “Current Status” or the Drop-Down Menu Arrow next to the “Current Status”. (Statuses: Off Duty, Sleeper Berth, Driving, On-Duty Not Driving, Yard Move, and Personal Conveyance.)
-
My Trips
The My Trips section is where you can view your previous, current, and future loads. My Trips consists of 3 different tabs: Current, History, and Scheduled. From the menu, tap “My Trips”, to open the My Trips section. Once the My Trips section loads, it automatically opens to the Current tab. To switch to the History and Scheduled tabs, tap on the desired tab at the bottom of the Current tab.
-
Logbook
Tapping “Logbook”, will expand the Logbook drop down submenu that contains HOS, DVIR, Driving Team and Unidentified Driving. Once you’ve opened to one of the Logbook sub-menu pages below, you will then be able to open the Dot Inspection page and the Daily Logs page.
-
HOS
This page’s name is HOS Recap and HOS stands for, “Hours of Service.” The HOS Recap page breaks down the hours in a driver’s work period. This is where we keep track of time spent toward your 34 Hour Reset Period, 11 hour Driving Limit, 14 Hour Shift Limit, and 60/70 Hour 7/8 Days Cycle Reset.
-
DVIR
DVIR stands for, “Driver Vehicle Inspection Report”. This inspection must be completed by the driver, at the end of each workday. The DVIR is vital because it reveals any faults, or defects on the vehicle, or equipment, and allows the problems to be repaired in a timely manner. The DVIR page is where you record the results of the inspection. Under the Logbook submenu, tap on “DVIR” then the DVIR page will open.
-
Driving Team
Some drivers work as a team, taking turns driving the truck. Team Driving increases the total amount of hours spent driving, allowing drivers to cover more miles which results in more earnings. Tapping on “Driving Team” from the Logbook submenu, brings up the Manage Driving Team page. The Manage Driving Team page records which drivers are part of the team, who is currently driving and all other aspects of team driving.
-
Unidentified Driving
The company must keep record off all Unidentified Driving from at least the past 6 months. Under the Logbook sub-menu, tap on “Unidentified Driving” to open the Unidentified Driving Time page. On the Unidentified Driving Time page, drivers can manage and certify driving data.
-
Daily Logbook
To access this page, you must first open one of the other 4 pages from the Logbook sub-menu. Then at the bottom of one of those pages you will see a Logs tab. If you click the “Logs” tab, it will bring you to the Daily Logbook page. The Daily Logbook page is where drivers can manage their daily driving logs and violations.
-
Dot Inspection
The Dot Inspection page is where all your daily log data can be found. On the Logbook sub-menu, select and go to one of the pages. From any of those pages, at the bottom of the page you will see a DOT Inspection tab. If you click the “DOT Inspection” tab, it will bring you to the DOT Inspection page.
-
Paid Time Off
After opening the menu, tap on “Paid Time Off”. That will open the PTO page, where you can view PTO totals and request paid time off.
-
Gallery
Selecting “Gallery” from the menu will load the Gallery page. This page lists every photo that has been uploaded to EF by the driver. You can also edit your uploaded photos from here too.
-
Training
Tapping “Training” will open the Training drop-down menu. Under that sub-menu is “Training Videos” or the “Training Completed” page. Currently, there are not any training videos for you to view yet. Once they are available though, the videos will be located under these pages.
-
Training Videos
Any Training Videos that drivers are required to view will be listed under this page.
-
Training Completed
After you have viewed the required training videos, then the videos will be moved under “Training Completed” section.
-
Logout
The final part on the menu is the Logout section. Tapping on “Logout” opens the window where you can log out of the app. Sometimes when drivers try to logout of their account, they will get the error, “You have # uncertified logs!”. Then it gives you 3 options: “Cancel”, “Review and Certify”, or “Sign Out Anyway”.
-
“Cancel”
Selecting “Cancel”, will cancel your attempt to log out. Every time you attempt to logout, if you select Cancel, the error will continue to reappear. Until you choose another option you won’t be able to logout.
-
“Review and Certify”
If you select “Review and Certify”, the app will load a new page where you can validate your Data Entries and Statuses. Once you have validated all the entries, click “Agree – Submit”. Then go to the Menu and try logging out again. Now the error should be gone, and you can logout of your account.
-
“Sign Out Anyway”
Selecting “Sign Out Anyway”, allows drivers to temporarily skip certifying their Data Entries and Statuses. Even though this option allows you to logout, eventually you must review and certify your logs.
-
EDIT PROFILE
Edit Profile – Editing Profile & Uploading Data
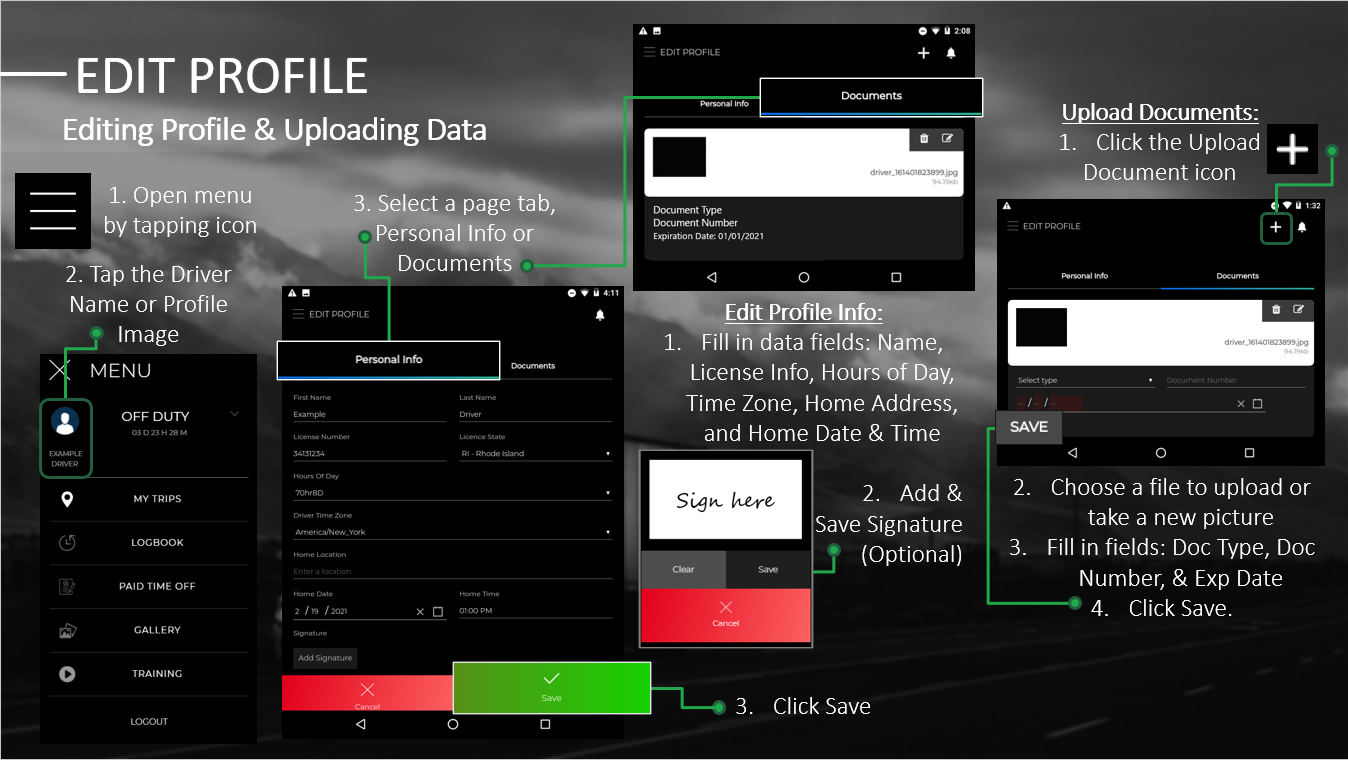
The Edit Profile page is where drivers can edit Personal Info and upload any Documents related to their profile. There are two tabs that make up the Edit Profile section the Personal Info tab and the Document tab. Drivers can upload document types such as license, TWIC, passport, ECT, qualification, and other.
Steps to Edit Profile:
- Open the Menu by tapping the icon. (See image Step 1)
- Tap the Driver’s Profile Picture or Driver’s Name (Located at the top left of the menu) this will open the “Edit Profile” page. (See image Step 2)
- When the Edit Profile page loads, it will automatically open to the Personal Info tab. To switch between tabs, click on the names of the tabs toward the top of the screen. (See images Step 3)
Personal Info Tab
Drivers can change Personal Info such as their first & last name, license number and state, Hours of Day (70hr8D or 60hr7D), time zone, home location (address), home date or time under this tab. The driver can also sign off on any of these changes, under the add signature field.
Steps to Change Personal Info Data:
- (On the Personal Info tab) First enter or modify the data in the required fields. All fields except Home Location are required to be filled In. (See image “Edit Profile Info”)
- Next you have the Signature Field, adding a signature is optional. If you would like to add a Signature Tap the grey “Add Signature” button, the signature window will pop up. Then sign your name in the provided area using your fingertip (or a stylus pen if you own one). Then save your signature by hitting the dark grey “Save” button on the bottom right of the signature box.
- Once you have finished entering data, to save your changes tap the green, “Save” button at the bottom right of the page. (See image Step 3 under “Edit Profile Info”)
Documents Tab
Drivers should upload images of Documents such as: driver’s licenses, TWIC, Passport, ECT, Qualification, and other documents here. Paperwork related to loads should not be uploaded here.
Steps to Upload Documents:
- (On the Documents tab) First tap on the “Upload Document” icon, to open a File Search Window on the top right of the screen. (See image Step 1 under “Upload Documents”)
- In the File Search Window, choose a file to upload to your account then click, “Open”.
- Next fill in the fields for the document. Select a document Type from the dropdown menu, then fill in the Document Number and the Date. (See image Step 3 under “Upload Documents”)
- Now that the fields have been entered, click the grey “Save”, at the bottom right of the section. (See image Step 4 under “Upload Documents”)
MY TRIPS
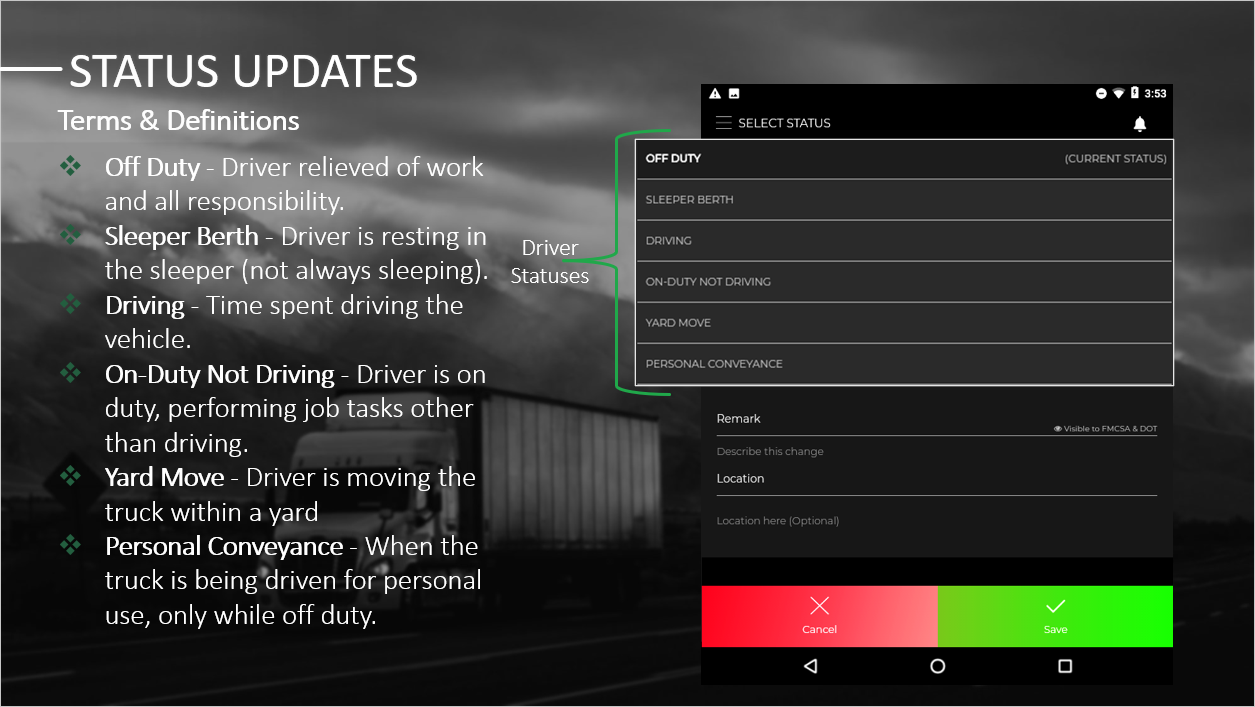
Status Updates – Terms & Definitions
From the beginning, till the end of the workday, all drivers are required to update their status on the Select Status page. It’s important that you keep track of your HOS because it keeps everyone (truck drivers, other motorists, and pedestrians) on the roads safe.
Terms:
-
Off Duty
At the end of the shift, when the driver is relieved from work and all responsibility for performing work. Your status should be changed to Off Duty. (This is not the same as resting in the truck because you are still on duty).
-
Sleeper Birth
The Sleeper Berth status is used when the driver is resting (Not necessarily sleeping) in the sleeper berth compartment of the truck.
-
Driving
Driving time is defined as any time that you spend at the vehicle’s controls, driving the truck.
-
On-Duty Not Driving
Anytime a driver spends not driving the truck and is on duty performing job tasks is On Duty Not Driving status. This includes time spent assisting or supervising the unloading or loading of the vehicle. Giving or receiving paperwork for loads and time spent remaining in a state of readiness to operate the vehicle.
-
Yard Move
When the driver is moving the truck in a yard their status is Yard Move. For example, when a driver is moving the truck closer to a loading dock or driving the truck around in a yard.
-
Personal Conveyance
Personal Conveyance is when a driver is using a truck for personal transportation, while off duty. Such as driving to a hotel, home, or to get some food while off duty!
Status Updates – How to Change Your Status
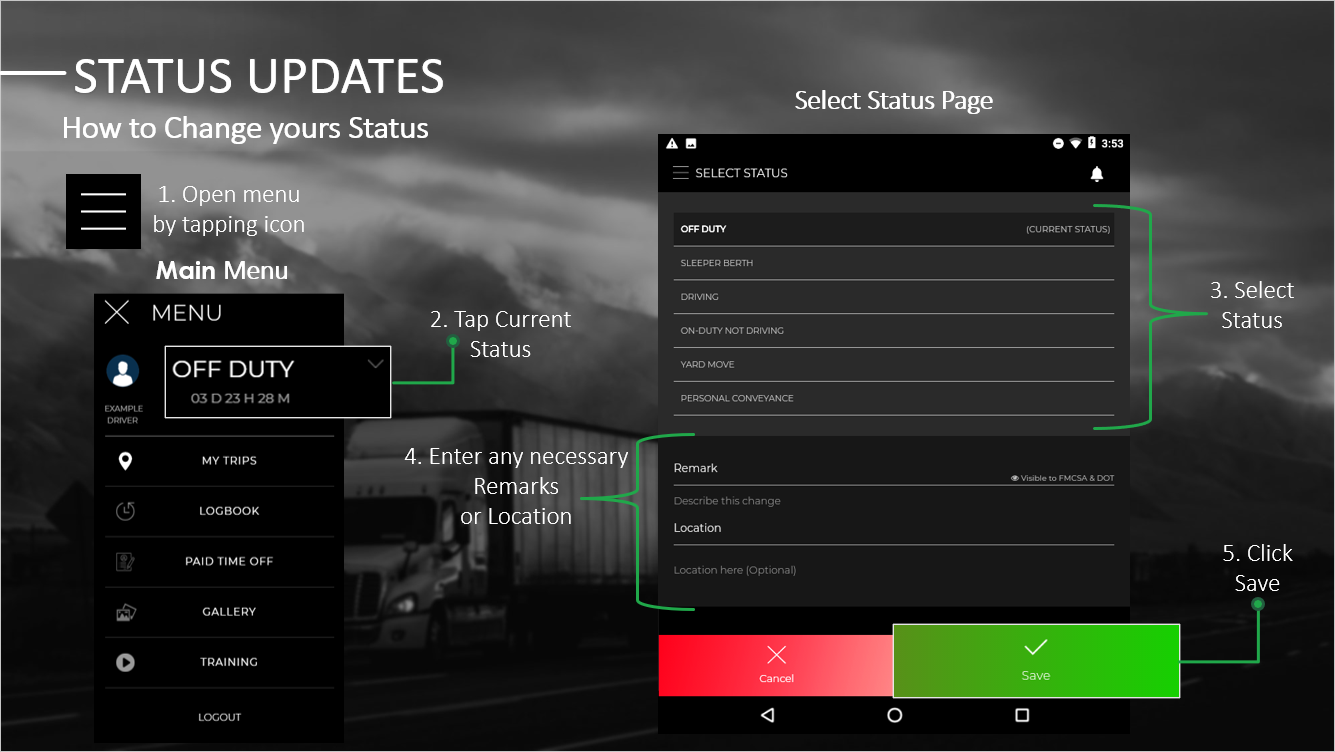
How to Update a Drivers Status:
- Open the Menu by tapping the menu icon. (See image Step 1)
- At the top of the Menu, is the driver’s Current Status. Tap the Current Status to open the “Select Status” page. (See image Step 2)
- Select the new Status at the top of the “Select Status” page. (See image Step 3)
- Enter Remark or Location if required or if preferred. (See image Step 4)
-
Remarks
- Some statuses require a remark, but for the rest it is optional. When it is required, and a driver tries to update their status without the remark, an error will appear. Additionally, until a remark is added, the driver will be unable to save the status changes.
- Only Remarks can be added or change, after a status has been saved in the daily logs section.
-
Location
- Adding a location to a status change is optional. If you would like to add the location of where you are currently or where you are going, you can add it here.
- Click the green “Save” button at the bottom right of the screen. (See image Step 5)
- Note: The app will not always let you change your status, there are restrictions based on the HOS regulations. For example, if a driver hasn’t met the 34 hours reset rule, they won’t be able to change their status to “On Duty”, because it’s against regulations.
Remark and Location, Status Change Example:
A driver just finished a load and is now off duty and wants to use the truck to drive home.
- First the driver would change their status to “Personal Conveyance”.
- Next, they’d add a remark such as “Off Duty, using the truck to drive home.”
- Then the driver could add a location such as “Home” or the drivers home address.
- Finally, the driver would click “Save” and the status update would be complete.
MY TRIPS
My Trips – Previous, Current and Future Loads
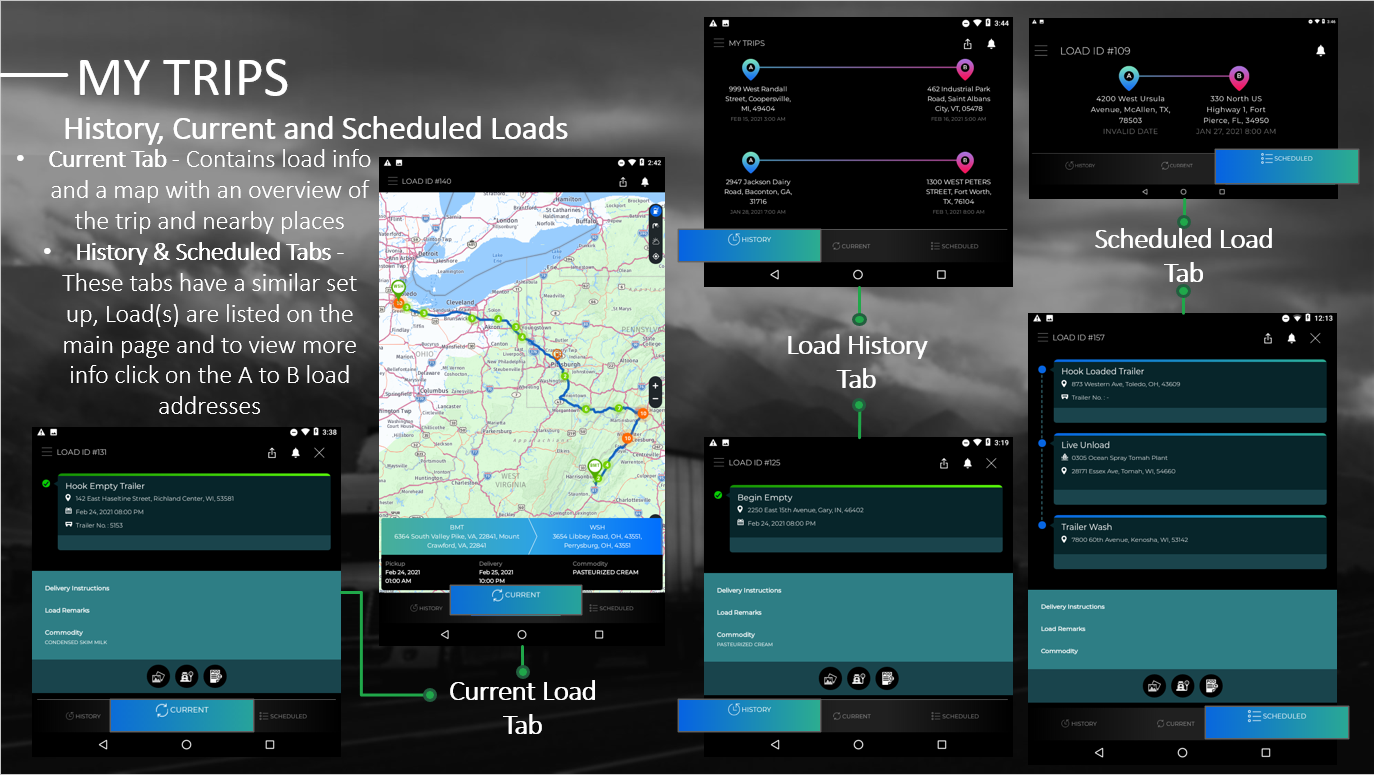
The My Trips section is made up of 3 tabs Current, History, and Scheduled. These tabs show the drivers previous, current, and future load data.
Current
The Current tab contains the details of the drivers’ latest ongoing load and features an interactive map of the trip.
The Current tab is also where a driver can upload files related to the load (such as Proof of Delivery, Bill of Lading images).
History
The History tab lists the driver’s previous loads, with the most recently completed loads at the top of the list, and the older loads at the bottom.
Scheduled
If a driver has a scheduled load for the future, it will be located on the Scheduled tab.
How to View My Trips Tabs:
- First open the Menu.
- Then tap on “My Trips” at the top of the menu’s list. This will bring you to the My Trips section of the app.
- To switch between pages, just click one of the other tabs (History, Current or Scheduled) highlighted in grey at the bottom of the screen.
When the My Trips section loads, it automatically opens to the Current tab. To tell which page you are on, look at the tabs at the bottom of the screen. The tab that is opened will be highlighted in blue. While the other two tabs will be in grey. (See images “Current Load Tab”, “Load History Tab”, and “Scheduled Load Tab”)
My Trips – Current Load
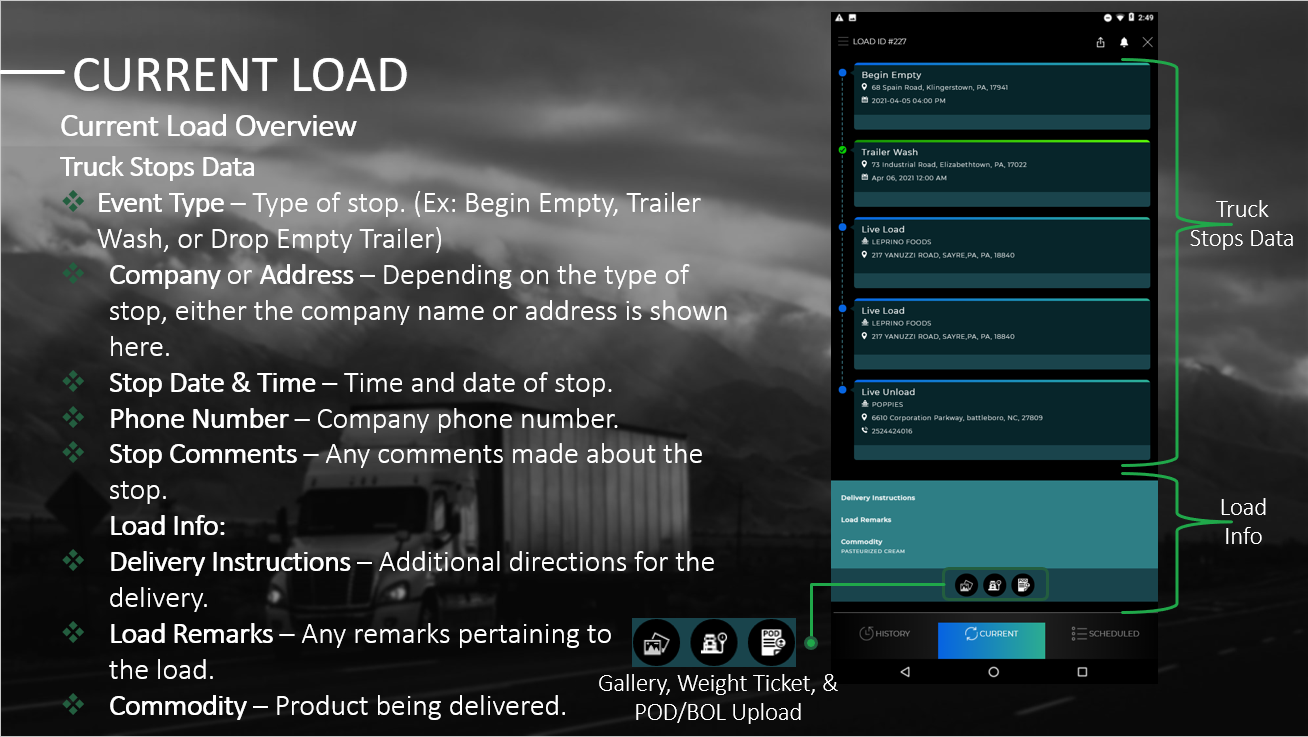
The Current Load is made up of two parts. The top part contains all the loads stops and their data. The bottom part has the loads main info. When the app first loads (after you log in), it automatically opens to the My Trips, Current Load tab. You can also choose My Trips from the Menu, and then select the “Current” tab at the bottom of the page, to open the Current tab.
Truck Stop Data:
Each stop, in the load has its own segment at the top of the page. The truck stops are listed in chronological order, starting with the first stop on top, and ending with the last stop on the bottom.
-
Event Code
Every stop has an Event Code that tells us what type of stop is being made. (Here is an example of some stop codes: WSH = Wash, BBT = Begin Bobtail)
Company Name or Address
Depending on the Stop Type, some have a Company Name and other the Address. Each Address contains the stops street address, city, state and Zipcode.
Stop Date & Time
The date underneath the Addresses or Company Names, is the date and time that the stop was Completed.
Phone number
The Phone Number is the number for the shipper and consignee. If a number is tapped on, then the dial pad will open with that number ready to dial.
Stop Comments
Any Comments related specifically to a stop, will appear at the bottom of that individual stop data. (This is different than Load Remarks)
Load Info:
In this section is all the essential load data that is needed to complete the delivery.
Trip Mileage
The mileage is measured from the trips pick up location to the drop off address.
Shipper & Consignee
The Shipper is the customer that is paying to ship the load. And the consignee is the customer that is responsible for receipt of the shipment.
Pickup and Drop Off
The pickup and drop off are the addresses of which the load is being picked up from and delivered too.
Delivery instructions
Any specified instructions about the delivery for the driver, would be listed here towards the bottom of the screen
Load Remarks
Remarks pertaining to the load itself, or drivers goes under here.
Commodity
The product (or commodity) that is being delivered is listed under here, at the bottom of the page.
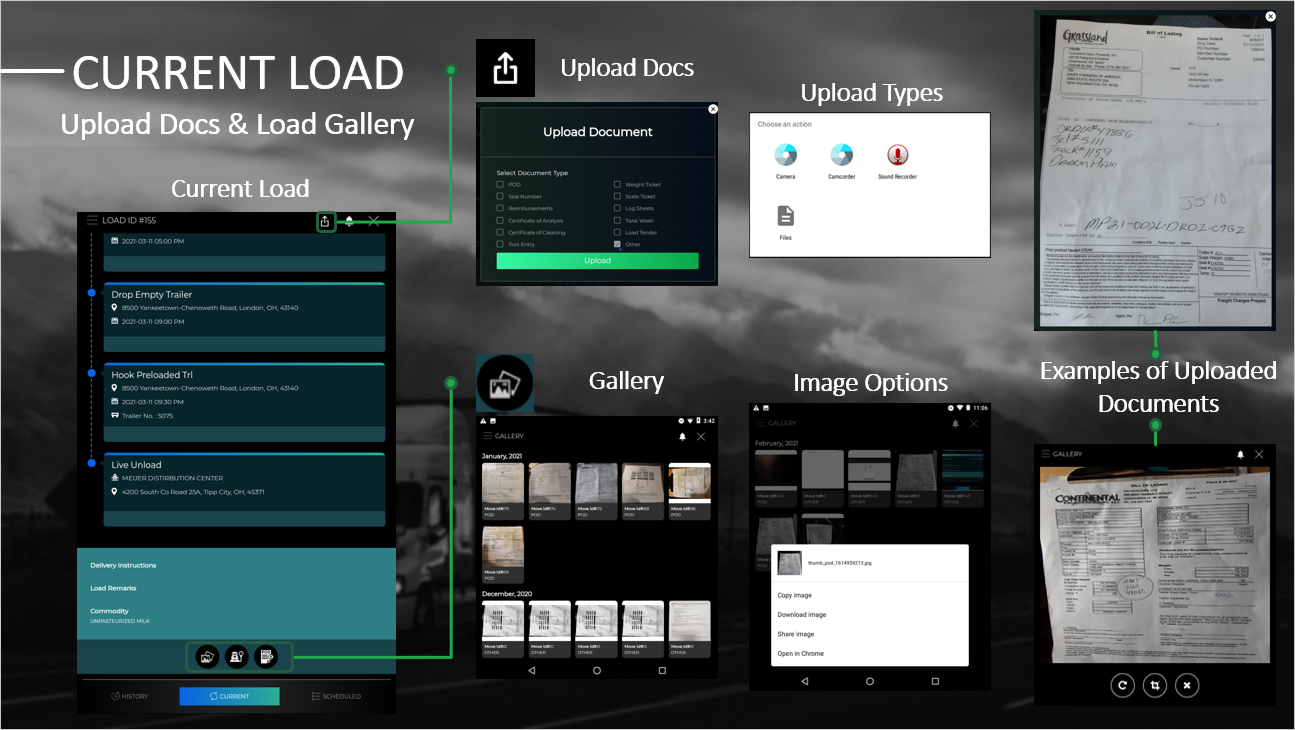
Current Load – Upload Docs & Load Gallery
These are all the icons or tools available under the My Trips, Current pages.
Upload Docs
The Upload Docs icon on the Current Load tab is used to upload documents for that specific load only.
- First open the Upload window by clicking the icon on the top right corner or the My Trips, Current Load tab. (See images “Current Load” or “Upload Docs”)
- When the Upload Document window first opens, you must select the type of document that you are uploading. Then click the green “Upload” button. (See image “Upload Docs”)
- Clicking the Upload button, opens the File Search window. Then you select the document to upload from your tablet and click the grey “Open” button. (See image “Upload Types”)
- Finally, the Document will open in the Upload Docs window and the doc will have auto saved to the load. (See image “Examples of Uploaded Documents”)
How to Upload Documents:
Note: If the wrong Document has been uploaded to the load; then drivers can Call their Dispatcher. Dispatch can delete the unwanted Doc from the load through the administrative site. Then the driver can go through the previous steps again to upload the correct document.
Gallery
Any Documents the driver has uploaded to their load, will be listed under the load’s Gallery page.
The Load Gallery is used for reviewing the documents for any specific Completed or Current Load.
There is another Gallery that is located on the Menu, these are two Different Galleries! This Gallery is only for viewing the specific loads uploaded documents. The other Menu Gallery has every document from every load that has been uploaded to the app (Menu Gallery).
- First go to the desired load using the My Trips, Current or History tab. (See image “Current Load”)
- Scroll to the bottom of the load where the Gallery, Weight Ticket and POD/BOL icons are then click on the Gallery icon. (See images “Gallery” or “Current Load”)
- Now the Gallery Window for the load should be open. (See image “Gallery”)
- Click on any image to view the file tools. From here you can Copy, Download, Share, or Open the image in Chrome. Drivers can also double click an image to view the image in a larger window. (See images “Image Options” or “Examples of Uploaded Documents”)
How to View Gallery for any Load:
These instructions explain how to use the Gallery, and can also be used on previously Completed loads under the History tab.
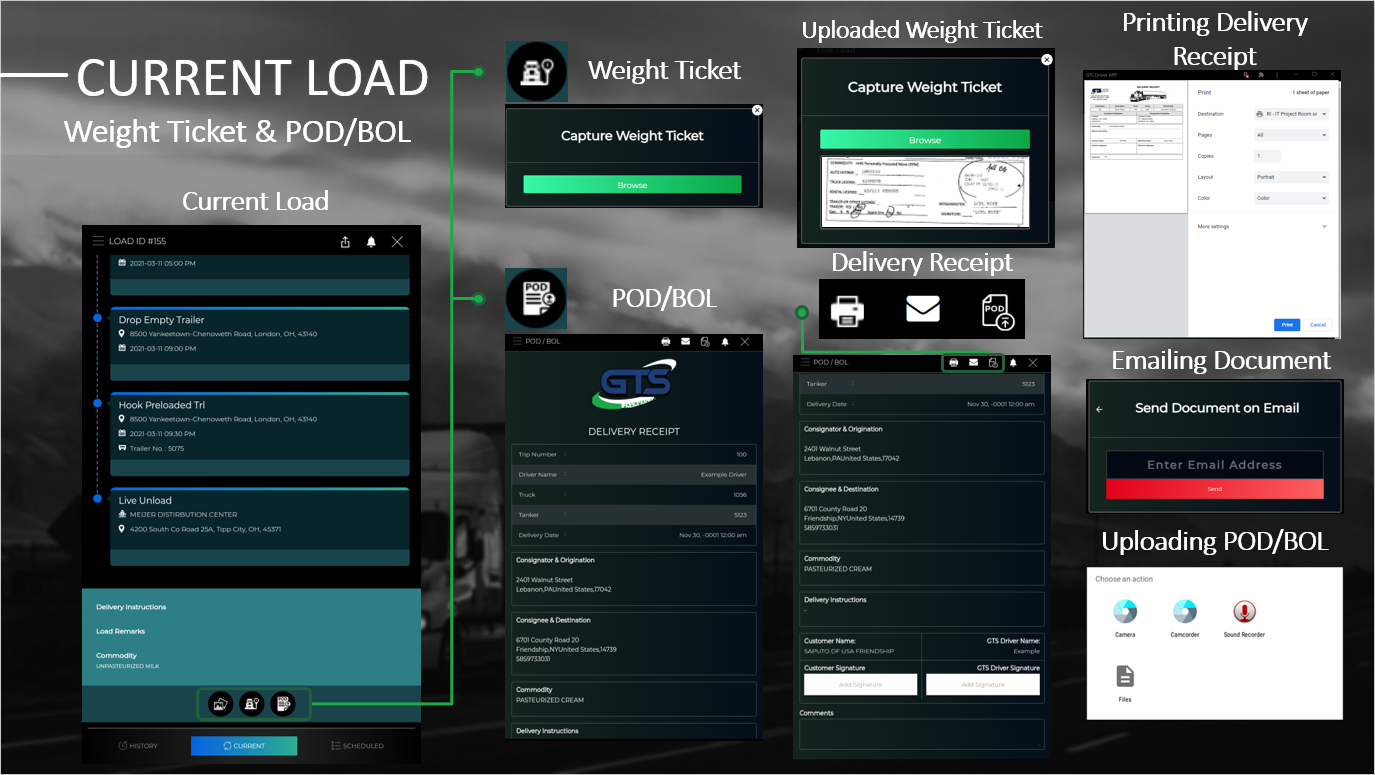
Current Load – Weight Ticket & POD/BOL
Capture Weight Ticket
The Weight Ticket icon on the Current Load tab is used by drivers, to upload Weight Ticket images, from the files on their tablets. The Capture Weight Ticket icon can be found under the Load Info section of the Current load.
- First open the Capture Weight Ticket window by clicking the Weight Ticket icon at the bottom of the Current Load tab. (See image “Current Load”)
- When the Capture Weight Ticket window opens, tap on the green “Browse” button.
- After clicking the Browse button, the File Search window will open. Then you may select the Weight Ticket Document from your tablet’s files. (See image “Weight Ticket”)
- Once the proper document has been selected, click the grey “Open” button, or double click the documents name.
- Then the Weight Ticket will auto save to the load once it loads to the Capture Weight Tickets window. (See image “Uploaded Weight Ticket”)
How to Capture Weight Tickets:
If the wrong Ticket has been uploaded to the load, then reopen the Capture Weight Ticket window. Next tap the green “Browse” button again and select the correct file. Doing so will overwrite the previous file saved to the Weight Ticket.
POD/ BOL
This icon is where drivers can upload Proof of Delivery, or Bill of Lading and print out or email Delivery Receipts. The icon is located at the bottom of the Current, My Trips tab.
- On the Current Load tab under My Trips, scroll to the bottom of the load and click the POD/BOL icon.
- Clicking the icon loads the POD/ BOL section of the app. You will either see the Delivery Receipt or POD/BOL. If the POD/BOL doc has not been uploaded, then you will see the Delivery Receipt. However, if the POD/BOL doc has been uploaded than you should see the POD/BOL.
- Continue to “Uploading the POD/BOL Document” if you need to upload the POD/BOL document. You can continue to “Printing/ Emailing the Delivery Receipt” if you need to Print or Email your Delivery Receipt.
- On the top of the POD/BOL page and next to the Notification icon, is the Upload POD/BOL icon. Click the Upload POD/BOL icon to open the Search Window.
- On the tablet, the Search Window gives 4 options, but only the “Camera”, and “Files” Upload button work.
- On the top of the POD/BOL page is the Print and Email icons. Click the Print icon to Print or Save the Delivery Receipt as a PDF.
How to Upload POD/BOL Documents & Print/ Email the Delivery Receipt:
Uploading the POD/BOL Document:
(Continuing from step 3) The screen should currently show the Delivery Receipt on the POD/BOL page.
Camera
The driver can tap the “Camera” button, take a picture of the POD/BOL document, and save the photo by tapping the check mark. Tapping the Check Mark approves & saves the photo as the POD/BOL document image.
Files
The driver can tap the “Files” Upload button, choose a File from the tablet to upload, and save it as the POD/BOL doc. Tapping a File from the tablets Search Window, automatically opens and saves it as the POD/BOL doc.
Printing & Emailing the Delivery Receipt:
(Continuing from step 3) The screen should currently show the Delivery Receipt on the POD/BOL page.
Print Delivery Receipt
Clicking the “Print” icon open’s the Print Preview page. From the Print Preview page, select a printer from the top left of the window, then hit the “Print” button. Then the Delivery Receipt should print from the selected printer.
Email Delivery Receipt
Click the “Print” icon, to open the Print Preview page. From the Print Preview page, select Save as PDF from the top left corner. Then tap the blue circular “Save as PDF” button towards the top right on the document. Finally, you should select a File to save the pdf under, enter a Name for the PDF then hit the blue “Save” at the bottom right of the page.
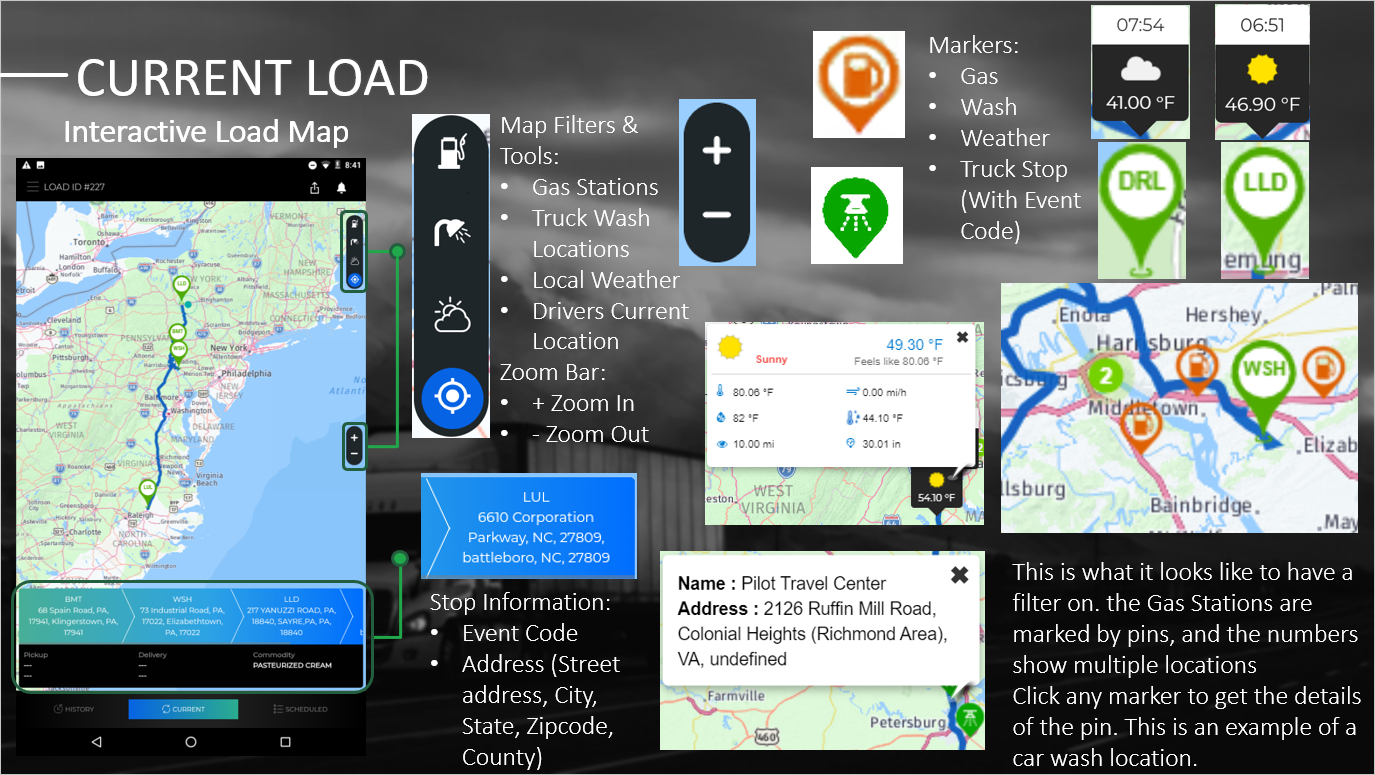
Current Load – Interactive Load Map
The Current Load tab has an interactive map that shows a complete overview of the driver’s trip. The map also has different plotting filters that mark the location of Gas Stations, Truck Wash, and Local Weather. There is also a filter that shows the current location of the tractor. All these filters make it easy for drivers to find rest stops closer to the planned route.
To navigate around the map, just touch and drag on the map. To zoom in and out on the map, use the plus sign or double tap the screen to zoom in and use the minus sign to zoom out.
Map Filters:
- Each Stop in the load is marked on the map with a green pin and the event code.
- When you tap on the Stop marker pins, the address of the stop appears in a comment bubble.
- The Tractor’s Current Location is shown on the map with a blue flashing circle.
- Tapping on the Current Location marker shows the how far the tractor is from the next stop.
- The Gas Station markers are orange pins with a pump symbol.
- To view the Gas Station markers name and address, tap the pin.
- The markers for the Truck Washes are green with a shower symbol.
- Tapping the Wash marker opens a comment bubble that shows the name and address of the wash station.
- The Local Weather markers are black and white and show the temperature with an image (such as a sun, or clouds) that represents the current weather.
- Tap the Weather marker to get more information on the weather including the temperature, wind speed, visibility and more.
Load Stop
Tractors Current Location
Gas Station
Truck Wash
Local Weather
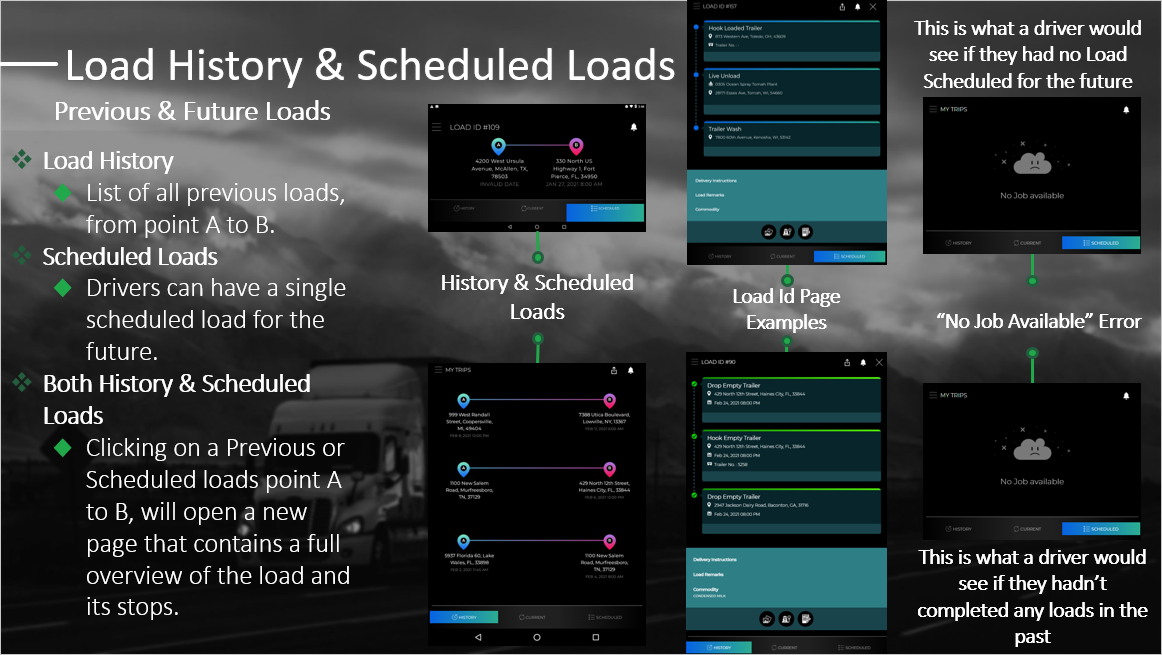
Load History & Scheduled Loads – Previous & Future Loads
The My Trips, Load History & Scheduled Load tabs are very similar on the app. The main page of both the History and Scheduled tab lists the drivers load(s) from point A to B.
History:
- Unlike the other tabs, the History tab shows all the previous loads of a driver, while the Scheduled and Current tabs show only one load.
- The History tab lists your previous loads, with the most recently completed loads at the top of the list, and the older loads at the bottom.
- The History tab is also where a driver can upload files related to the load, even after it’s been completed (such as Proof of Delivery, Bill of Lading images).
- If the driver has not yet completed a load, then the History tab will give an error and be empty. (See “No Job Available” Error image)
Scheduled:
- A driver can only have one scheduled load for the future, so that’s why the Scheduled tab only shows a single load.
- If a driver doesn’t have a load scheduled for the future, then the page will be blank. (See “No Job Available” Error image)
How to View the My Trips History or Scheduled Tabs:
- First open the Menu.
- Then tap on “My Trips” at the top of the menu’s list. This will bring you to the My Trips section of the app.
- To switch to the History or Scheduled pages, just click on the tab (“History” or “Scheduled”) highlighted in grey at the bottom of the screen.
- To view a loads full trip overview, click on point A or B on the History or Scheduled Loads tab. Then app will open to the Loads Id page. (See “Load Id Page Examples” images)
Note: When the My Trips section loads, it automatically opens to the Current tab. If you are unsure of which tab you are on, look at the tabs at the bottom of the screen. The tab that is opened will be highlighted in blue. While the other two tabs will be in grey. (See image “History & Scheduled Loads”)
LOGBOOK
Logbook – HOS Recap & Daily Logs Page
HOS Recap Page:
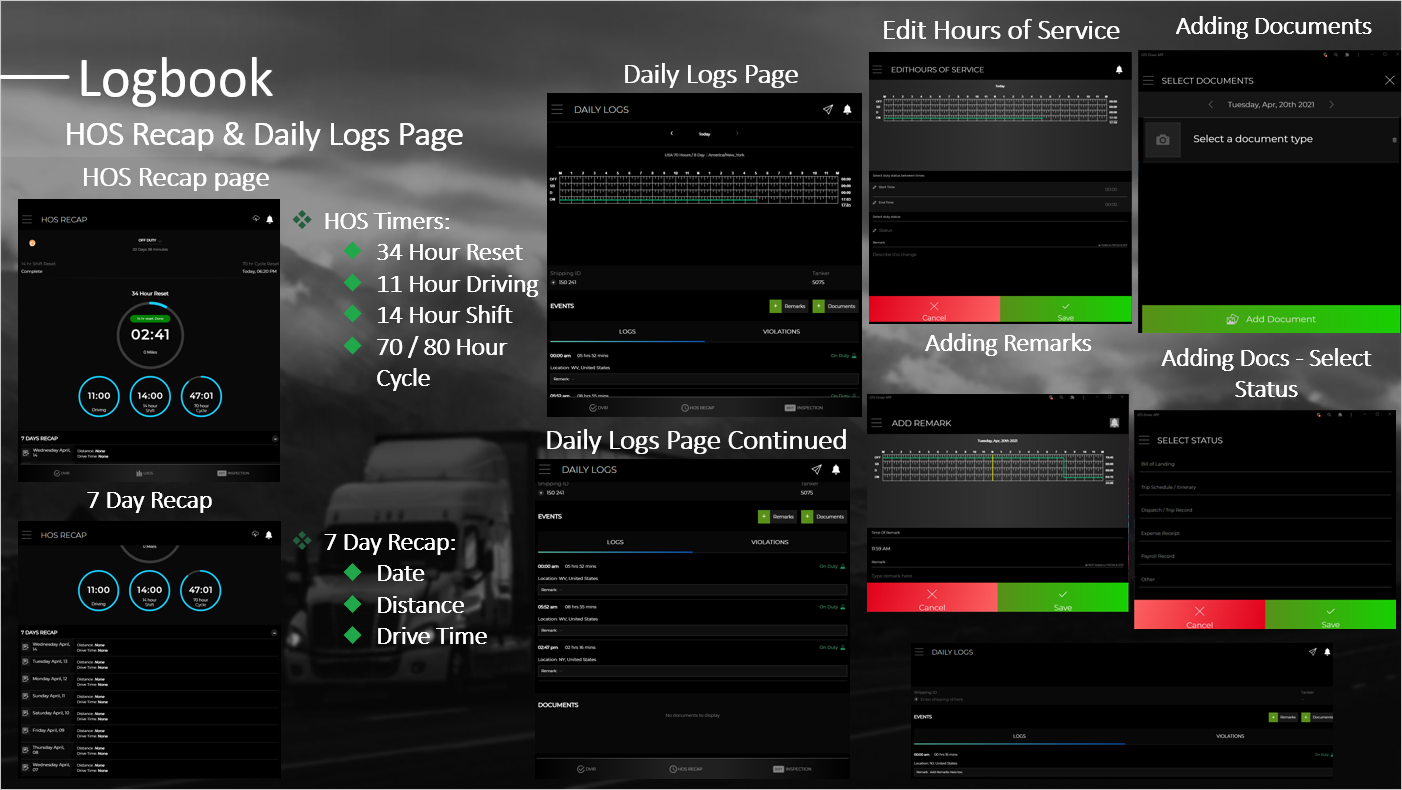
- The HOS Recap page is where drivers can review the hours of service for their Driving time, Work Shift, Reset Period and Work Cycle. Drivers can also load the Status Update page from here and review their Daily Logs from the previous 7 days. (See “HOS Recap page” image)
HOS Tracking:
- There are 7 to 8 days in a work week, of that a driver can only work 60-70 Hours total. Drivers work in 14 Hour shifts, following 10 Hours of being Off Duty. Out of the 14 Hour shift, a driver may drive for 11 Hours max.
- Once a driver has worked a max of 60-70 Hours over the 7-8 Day work week, then the driver must take a 34 Hour Off Duty Reset period. The timers below keep track of these times.
- HOS is a term for referring to the number of hours that a commercial motor vehicle driver may work per day, week or other. (The work period is mandated by the FMCSA Federal Motor Carrier Safety Administrative)
- The largest timer in the middle of the screen is the 34 Hours Reset Timer.
- This is where drivers can keep track of their Reset time. When they’ve finished their 34 Hours, the timer will reset to 00:00 (zero hours & minutes) and within the timer a green alert will appear that tells the driver the 34 hour reset is done.
- After a driver works 60 or 70 Hours during the 7 to 8 Days work week, then they have a 34 Hour Reset period. During this time, the driver’s status is Off Duty.
- The Driving Timer is the far-left timer, in the middle of the HOS Recap page.
- This timer keeps track of how much driving time a driver has left.
- Drivers may only drive for a max of 11 Hours, after 10 Consecutive Hours of being Off Duty.
- The Shift Timer is the second timer in the row of three, in the middle of the HOS Recap page.
- This timer keeps track of the time spent towards a drivers 14 Hour Shift.
- Drivers may not drive after being on shift for 14 Hour following the 10 hours of Off Duty time.
- The Work Cycle Timer is the last timer all the way to the right of the screen.
- This Timer tracks the Hours Worked during the drivers work cycle.
- The total amount of hours a driver can work is 70 to 80 Hours depending on if a driver works 7 or 8 Days.
- An overview of the last 7 Days that a driver has driven is located at the bottom of the HOS Recap page.
- Each day lists the distance traveled and the drive time for that day.
- If you click on any of the Days from the 7 Day Recap, you will be brought to the Daily Logs page for that day.
HOS (Hours of Service)
34 Hour Reset Timer
11 Hour Driving Timer
14 Hour Shift Timer
70/ 80 Hour Work Cycle Timer
7 Days Recap
Daily Logs Page:
The Daily Logs page contains the Graphs and Logs for the current day and any previous days. There is also two tabs at the bottom of the page, Logs and Violations.
Hours of Service Graph:
- The HOS Graph tracks the hours spent Off Duty (OFF), Driving (D), On Duty (ON), and Sleeper Berth (SB) for that days 24 hours.
- At the very top of the Daily Logs page are arrows that change the date of the log being viewed. In between those arrows it shows the date of the log you are currently on. When the page first loads, the daily logs start on that current day, and will say Today instead of a date. (You cannot view logs for any future days, so the right arrow won’t work when you are viewing Todays graph.)
- At the top of the graph is the hours of the day, M stands for 12 Midnight, and the N stands for 12 Noon.
Clicking on the HOS Graph brings you to the Edit Hours of Service page.
-
Shipping ID
- Any Shipping Ids for the day will be listed under this field.
- To add another Shipping Id, click the grey and white plus sign and enter the id where it says, “Enter shipping id here”. To remove a Shipping Id, click the grey and white x sign.
- The id of the Tanker used for that day is listed to the right, under the graph.
- There is a button for adding Remarks and Documents to the graph. The buttons are located on the right, under the tanker id and are both green.
- There are two ways to Add a Remark. One you must select a Time of Day from the 24 hours of the day you are on. This means you must change the date on the Daily Logs page first then click the Add Remarks Plus Sign button. After that you can choose a Time of Remark from that day. Then add a Remark to the remark field and click the green Save button.
- The other way to Add a Remark, is to scroll down to the Logs tab and add a remark directly to the recap’s remark field.
- To Add a Document, you can first choose the date to add to on the Daily Logs page, but you can also change the date on the Select Documents page. then click the Add Documents Plus Sign button to open the Select Documents page.
- The Logs tab is where a driver can view any logs, they’ve made through out that day. Each log has a time of day, status, location (state and country) and a field for remarks (Remarks can be added here).
- Any violations that took place during the day, (that the daily log is set to) will be listed here.
Tanker Id
Remarks & Documents
Remarks
Documents
Logs Tab
Violations Tab
How to Edit Hours of Service:
- Clicking on the graph will open the Edit Hours of Service page.
- Here drivers can add any missing time they spent on any of the statuses.
- There are fields for selecting the duty status, Start and End Times, Selecting Status and adding a Remark.
Note: Once you fill in the fields just click the Green Save button at the bottom of the page to add the missed time.
Logbook – DOT Inspection
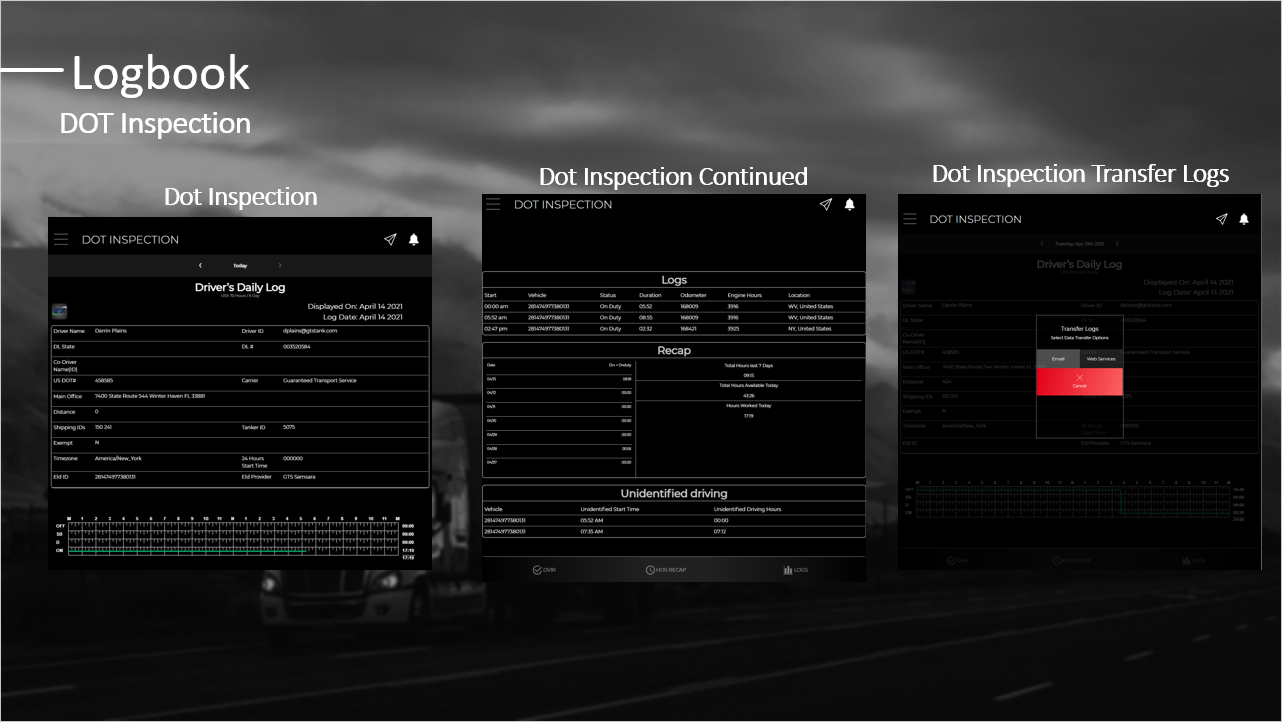
DOT Inspection (Department of Transportation Inspection)
- An inspection conducted by the DOT to ensure all CMV parts and accessories are safe to use, in good condition and working properly.
- If a driver is pulled over for a Roadside Inspection, this is the page that has the driver’s information, daily logs, recaps, and all other info they will need for the inspection.
- These logs can also be transferred by email or other web-services, by clicking the Transfer Logs icon on the top right of the page.
LOAD WALKTHROUGH
Load Walkthrough – Beginning Driver Shift
How to Begin your Shift:
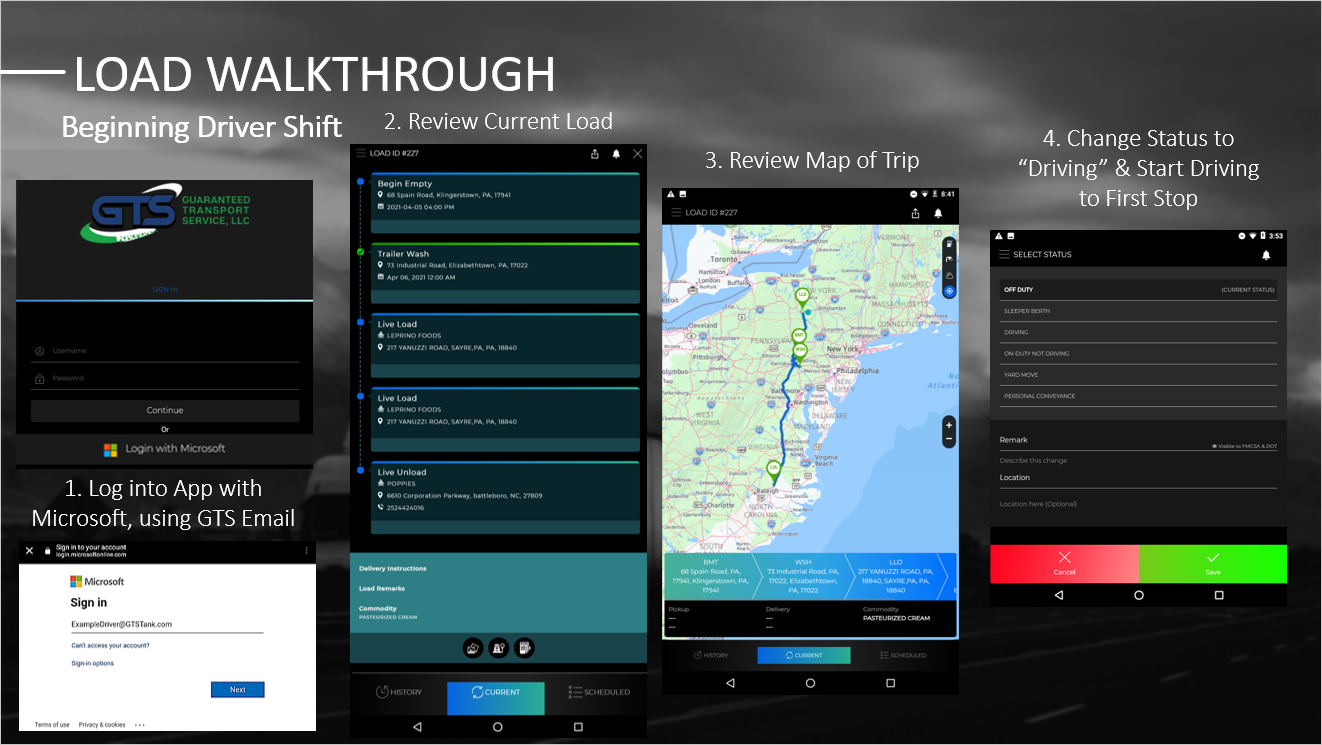
- Sign into the GTS App (See images Step 1)
- Open the App, then login with Microsoft with your GTS Email and Password.
- Click “Login with Microsoft” button. Enter GTS Email and tap “Next” button.
- Enter Password and tap “Sign In” button.
- Review Current Load (See image Step 2)
- Check that load stops are in the correct order.
- If any of the stops are not in the correct order than Call your Dispatcher!
- Review Map (See image Step 3)
- Check over the map of the trip, to make sure it is correct.
- Change Status to “Driving” & Begin Trip (See image Step 4)
- Open the Menu and tap the Current Status to open the “Select Status” page.
- Select the “Driving” status at the top of the “Select Status” page.
- Click the green “Save” button.
Load Walkthrough – During & End of Shift
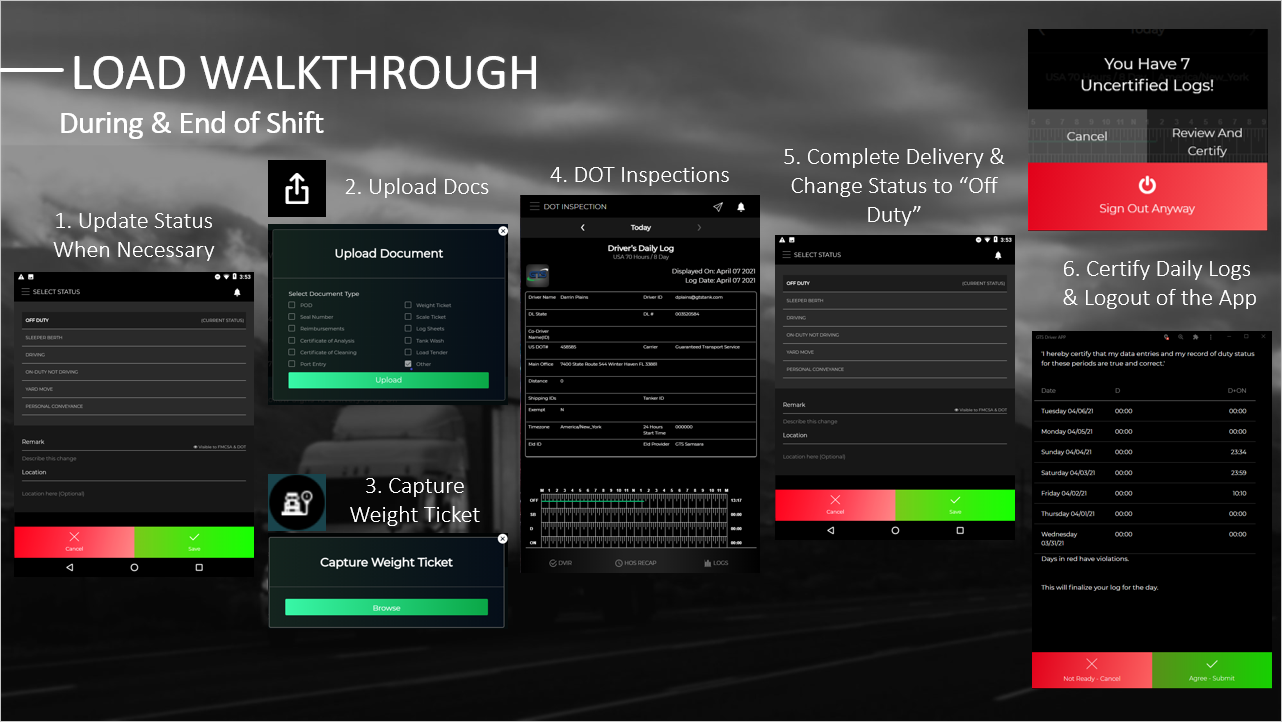
- Update Status when necessary (See image Step 1)
- Open the Menu and tap the Current Status to open the “Select Status” page.
- Select the Status to change to and click the green “Save” button.
- Change Status To:
- Sleeper Berth
- If the driver is resting in the Sleeper change status.
- The driver does not have to be asleep to use this status.
- Driving
- If the driver stopped driving and then started to drive the truck again.
- For example, if the driver took a break to sleep then came back to drive again change to status to “Driving”.
- On-Duty Not Driving
- If the driver is on duty but not driving his truck.
- Yard Move
- When the driver is moving the truck within a yard.
- Personal Conveyance
- When the truck is being driven for personal use, and the driver is off duty.
- Off Duty
- Driver relieved of work and all responsibility.
- Upload Load Documents (See images Step 2)
- Upload any required documents to the load throughout the trip using the Upload Docs icon on the My Trips, Current tab. Select the type of document then hit the green “Upload” button.
- Capture Weight Ticket (See images Step 3)
- Upload an image of the weight ticket to the load.
- Open the Capture Weight Ticket window by clicking the Weight Ticket icon at the bottom of the Current Load tab. Then tap on the green “Browse” button and select a file to Upload. Finally click the grey “Open” button and the document will auto save.
- Dot Inspection (See image Step 4)
- If the truck is pulled over for a Dot Inspection, follow these steps to open the Dot Inspection tab on the app.
- Open the Menu and click “Logbook”. Select “HOS” or “DVIR” from the Submenu. Once the page loads, click “Dot Inspection” at the bottom of the page, then you will be on the Dot Inspection page.
- Completed Delivery & Change Status to “Off Duty” (See image Step 5)
- Once the load has been Completed, and you have collected and uploaded all the proper paperwork (Such as Proof of Delivery), then you can change your driver Status to “Off Duty”.
- Certify Daily Logs & Logout of the App (See images Step 6)
- If you have not certified your Daily Logs, then your HOS will be incorrect.
- Also, if there are any logs that need certifying, a window will pop up asking drivers to certify their logs.
- Click “Review and Certify”, the app will load to the Review page. Review your daily logs and then click “Agree to Submit”.
SUPPORT
Hours of Service Support
For assistance with your hours of service, please contact the Safety Department at (863) 225-7622
Tablet Support
For assistance with the tablet itself, please contact the IT Department at (401) 437-4931

